
As a producer, you will have probably heard about how important compression is to a mix. It is known to tame sounds and reduce the dynamic range to fit audio comfortably into a track. That is true, and important to understand. But compression can also be a creative tool for shaping tone and texture. It can be used to create harmonic-rich sounds and add a subtle warmth to your tracks.
Using compression techniques with plugins from the 360 Essentials subscription can help you add an analog-style saturation to your tracks and enhance the harmonic quality of your mix. Let’s explore five ways to use compression that go beyond utility and tap into character-driven sound design.
Follow along with this tutorial using the 360 Essentials subscription.
Start free trial
Compression is an audio effect that works by reducing a signal’s dynamic range. In other words, it makes the loud parts of a sound quieter and the quiet parts louder.
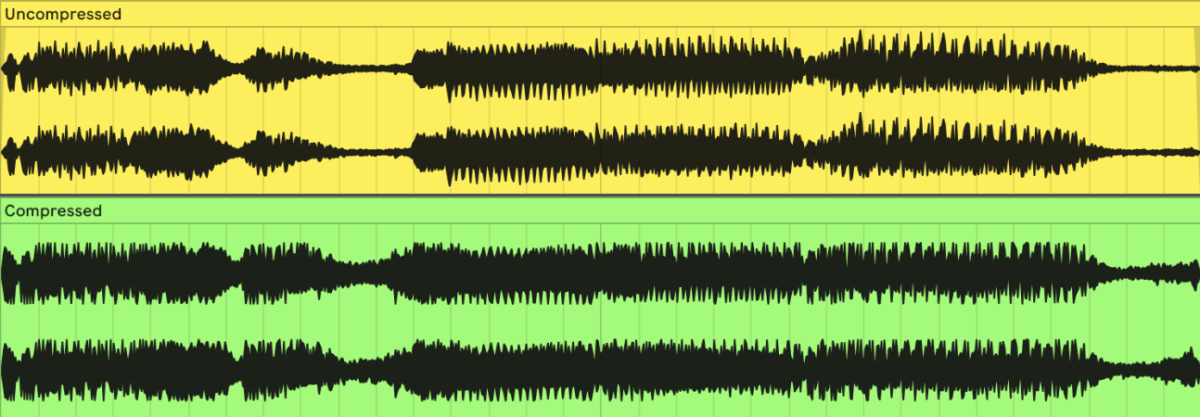
Here you can see that compressing the same waveform has made the audio more uniform in level. The quiet parts have been made louder, and vice versa.
But depending on the type of compressor and how it’s dialed in, it can do far more than control levels. When pushed, many compressors begin to generate harmonic distortion. This subtly colors the signal and makes it sound warmer. Many virtual compressors have been designed to include a simulated version of this analog saturation.
When you use a compressor, you’re not just changing the dynamic range. You’re actually reshaping the sound wave itself. And any time you change the shape of a waveform, you’re adding distortion. Not the heavy fuzz kind, but subtle harmonic distortion that adds color to the sound.
This happens because a compressor doesn’t change the volume instantly or evenly. It reacts over time, and that response can push or pull on different parts of the sound wave. The faster the compressor reacts (like with a quick attack setting), the more it bends the wave, and the more harmonics it creates, especially in the lower frequencies.
Even super slow audio compression adds this kind of change. So anytime you’re compressing, you’re also shaping the tone in small ways. You know that warm, punchy, or “glued” sound you get? That’s not just volume control. It is harmonic content being reshaped.
Let’s explore how you can use compression to your advantage with five creative compression techniques.
In many genres, drums are what hold the groove together. Compression is a way to enhance your drum sound into something energetic and special. Using Supercharger GT is a great way to add harmonic weight and analog-style grit.
Start by loading Supercharger GT onto your drum track. We’ll start by using the “Ghetto Drums” preset and altering it slightly.
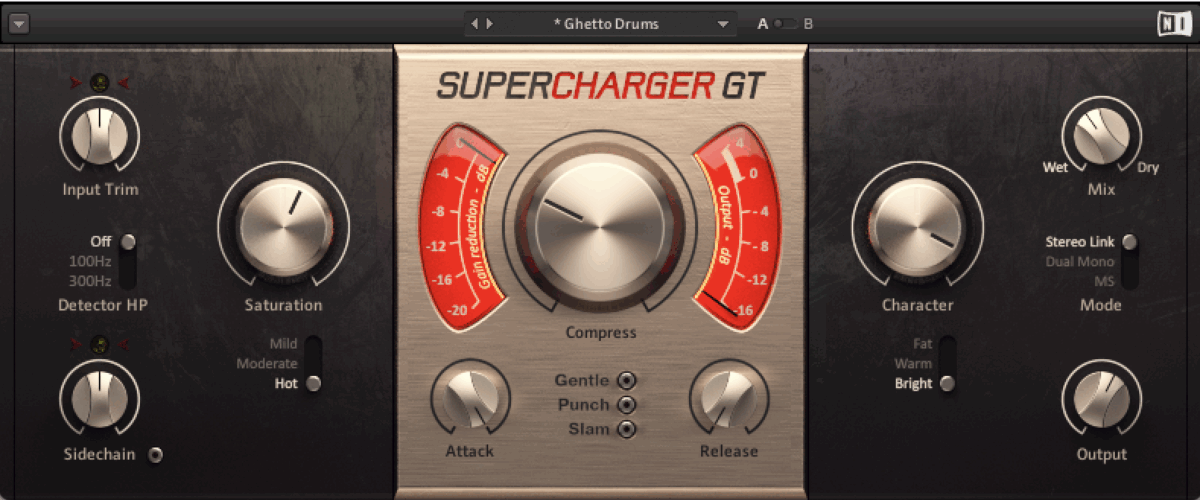
Start with the “Ghetto Drums” preset and adjust the parameters like this to recreate the sound we get.
We’re pushing the compressor quite hard here to get a highly saturated quality that sounds different from a standard saturator.
Here’s what the drums sound like dry:
Native Instruments · dry drums
And here they are with Supercharger GT:
Native Instruments · compressed drums
Of course, this is quite a dirty sound. You can dial back the wet sound on the mix knob to use this effect in a more nuanced way.
Compression isn’t just for individual tracks. It’s actually a great way to bring your mix together through buses or even on the master bus itself. When a compressor acts on multiple tracks and prevents any sound from exceeding a certain level, it can feel like it is “gluing” the sound together.
The bx_glue compressor is designed to mimic the behavior of classic bus compressors found in analog consoles while featuring modern controls. It adds cohesion and tone, without sacrificing the clarity you’ve worked hard to get into your mix.
We’re going to add the compressor to a stereo bus with all our tracks on and dial in the settings below. It’s generally good practice to use a lower compression ratio on bus tracks, but that’s just a rule of thumb. Always use your ears and go with what sounds best.
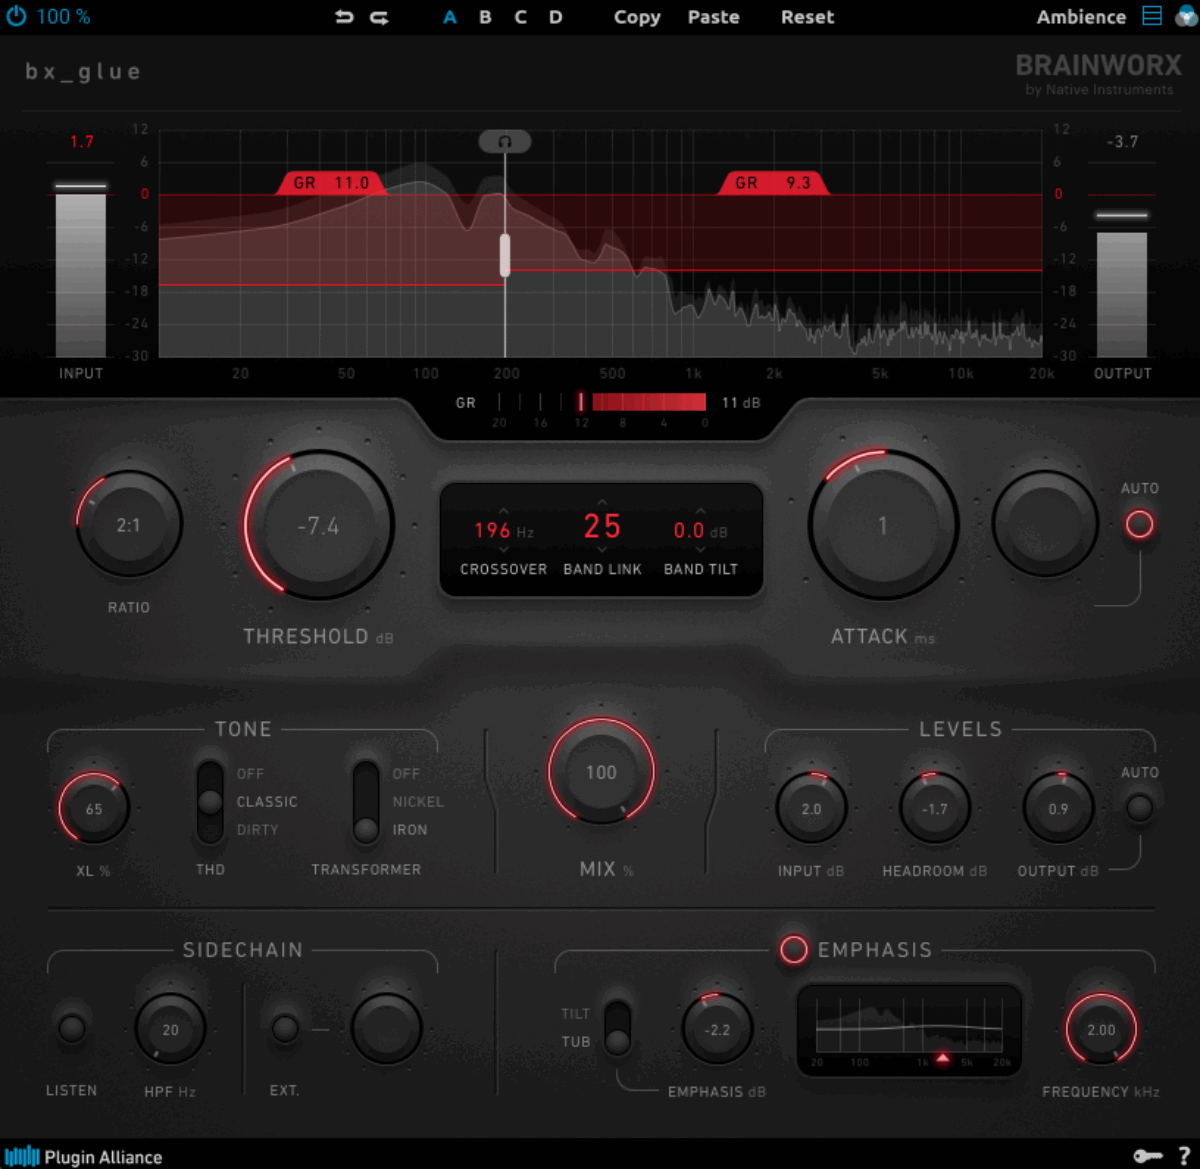
Make use of the “auto” output level functionality. This ensures that you hear the sound of the compressor itself rather than a jump in level.
Let’s hear what adding bx_glue to the master bus can do.
Here is a track without any master compression:
Make use of the “auto” output level functionality. This ensures that you hear the sound of the compressor itself rather than a jump in level.
Let’s hear what adding bx_glue to the master bus can do.
Here is a track without any master compression:
Native Instruments · no compression
Now let’s add bx_glue:
Native Instruments · bx-glue
This may sound quite subtle, but the compressor has reduced the peaks and increased the low-level signals of different tracks to add cohesion to the mix.
Vocals are one of the most receptive audio sources to compression’s harmonic potential and dynamic control. With the right compression on a vocal track, you can add tube warmth and presence that helps the performance feel intimate and polished. Moreover, it just helps vocals sit better in a mix.
To see this in action, let’s add Supercharger GT onto a vocal track. We’ll start with the “Vocal” preset, but once again, tweak what’s there to get exactly what we’re looking for.
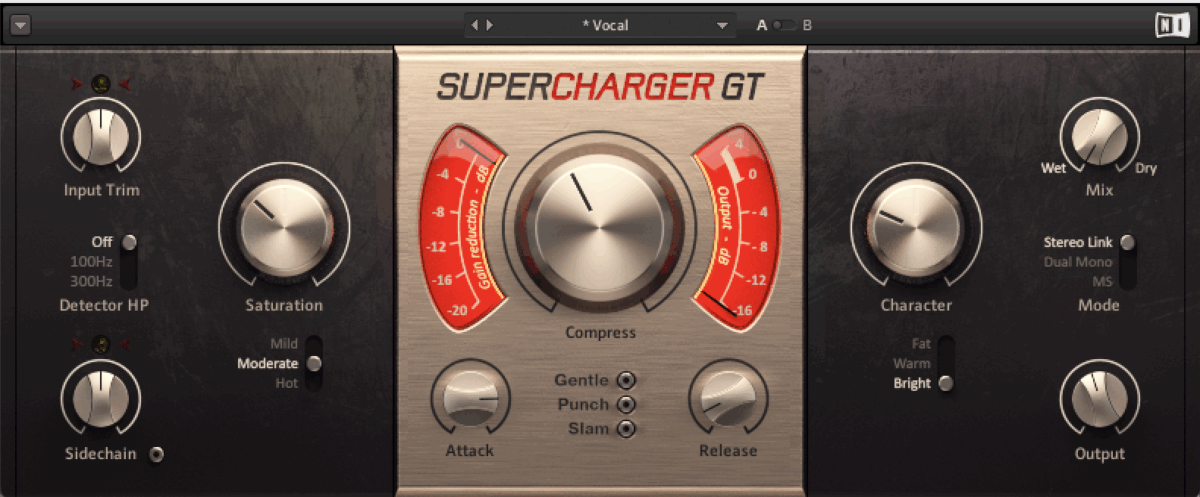
Supercharger GT adds the harmonic saturation necessary to make vocals audible.
Unlike transparent digital compressors, Supercharger GT enriches the vocal with saturation that enhances midrange clarity without making the performance feel harsh.
Here is our loop without compression on the vocal:
Native Instruments · vox dry
Now let’s add warmth and color with Supercharger GT:
Native Instruments · vox supercharger
With the compressor on, the vocal stands out from the rest of the instruments while also sitting better in the mix.
Guitar Rig 7 LE’s Tube Compressor is another fantastic way to get high-quality analog compression into your tracks.

Guitar Rig 7 LE features dynamic effects that can be applied to any instrument.
Of course, you could use Guitar Rig 7 on a guitar track. But what happens when we apply it to something a bit less conventional, like an instance of Massive X?
Here’s a bass patch created on Massive X:
Native Instruments · massive dry
Now let’s load up the Tube Compressor through Guitar Rig 7 LE:
Native Instruments · massive tube
The harmonics from the bass patch are brought to the front of the sound, to a point where the sound itself feels quite different. This can be a very effective way of creating harmonic presence in your tracks, and allowing subtle elements of your sound to cut through without turning up the volume.
Be careful, though. Intense compression like this can also increase the level of unwanted sounds.
Parallel compression is a classic studio trick that allows you to blend a heavily compressed signal with a dry track. This is a great way to retain natural dynamics while adding serious weight and saturation from compression. You can use whichever compressor you’ve enjoyed most so far, but choose something that isn’t too transparent.
First, add your compressor to a return track and make sure the track is set to pre-fader mode.
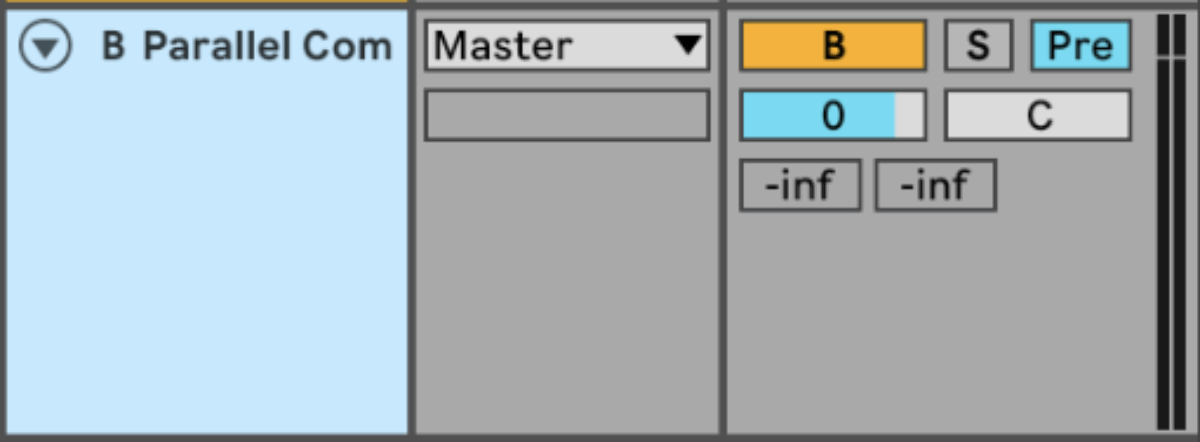
Using the return track in this way will ensure that the signal received from the original track is not affected by the output level of the dry track’s fader.
Next, send 100% of the signal from the drum track into the return track or bus. Be careful, this could get loud! You’ll want to balance the two signals with their faders so that the dry signal and the compressed signal sit together nicely.
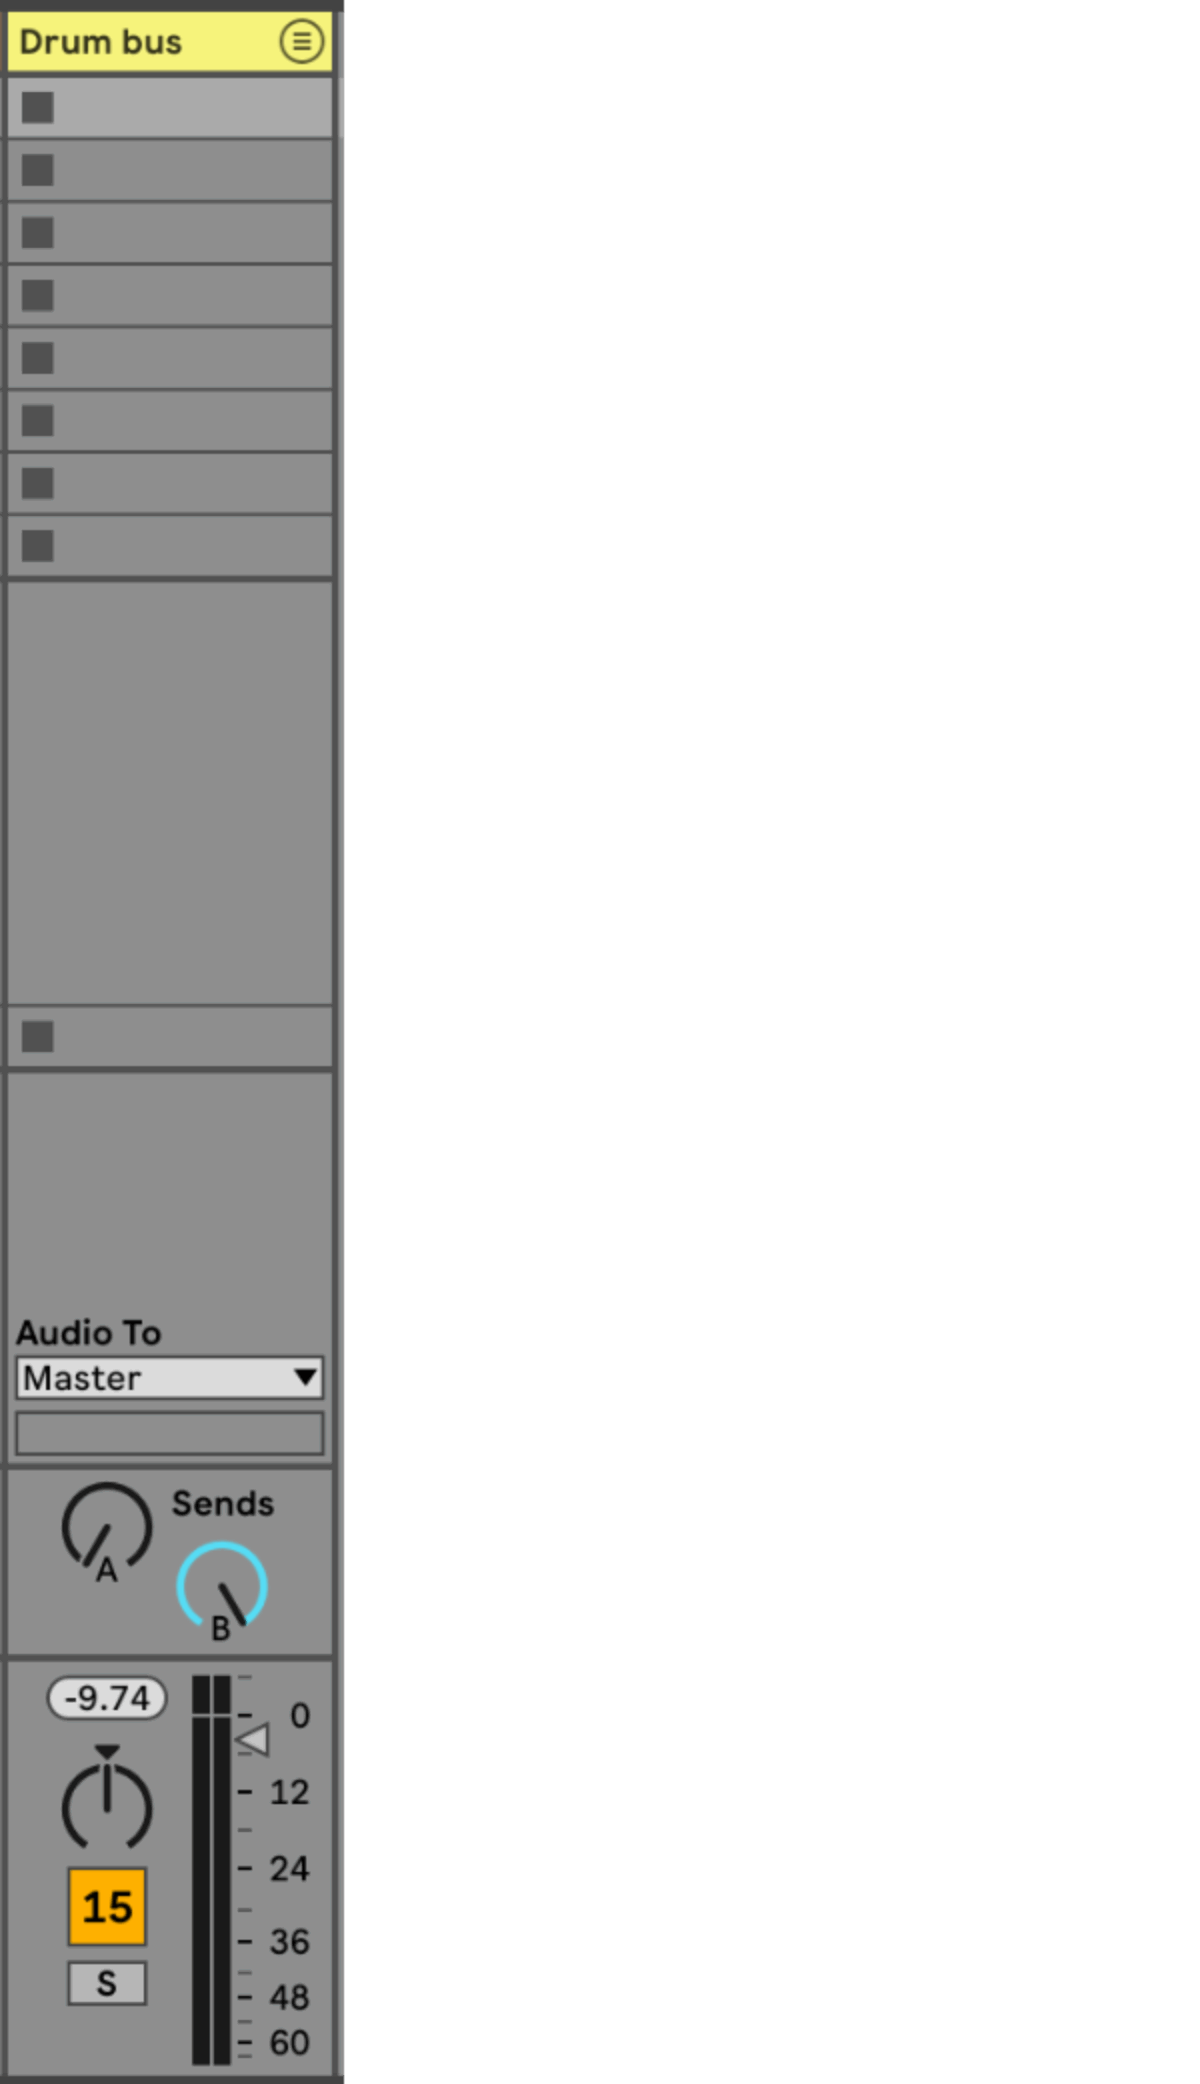
Sending the signal to return track B, which has the compressor on it.
Here is our totally dry drum signal:
Native Instruments · drums dry
And here is our parallel compressed signal.
Native Instruments · drums parallel
Finally, here is what they sound like blended together.
Native Instruments · drums blend
The result is a thicker, more harmonically dense sound that retains the natural feel of the original while adding saturation and impact.
Compression is a fantastic mixing tool, but it is also a launchpad for a harmonic-rich sound. With plugins like Supercharger GT, Guitar Rig 7, and bx_glue, you can do so much more than dynamic control.
Try these techniques using a 360 Essentials subscription and listen closely. You might be surprised at how much harmonic character can result from creative compression techniques.
Start free trial today
The post 5 ways compression can give you a rich, harmonically-driven sound first appeared on Native Instruments Blog.
Using compression techniques with plugins from the 360 Essentials subscription can help you add an analog-style saturation to your tracks and enhance the harmonic quality of your mix. Let’s explore five ways to use compression that go beyond utility and tap into character-driven sound design.
Jump to these sections:
- What is compression?
- Compression techniques for harmonic-rich sound design
- Conclusion: Explore these compression techniques with 360 Essentials
Follow along with this tutorial using the 360 Essentials subscription.
Start free trial
What is compression?
Compression is an audio effect that works by reducing a signal’s dynamic range. In other words, it makes the loud parts of a sound quieter and the quiet parts louder.
Here you can see that compressing the same waveform has made the audio more uniform in level. The quiet parts have been made louder, and vice versa.
But depending on the type of compressor and how it’s dialed in, it can do far more than control levels. When pushed, many compressors begin to generate harmonic distortion. This subtly colors the signal and makes it sound warmer. Many virtual compressors have been designed to include a simulated version of this analog saturation.
How does compression create harmonics?
When you use a compressor, you’re not just changing the dynamic range. You’re actually reshaping the sound wave itself. And any time you change the shape of a waveform, you’re adding distortion. Not the heavy fuzz kind, but subtle harmonic distortion that adds color to the sound.
This happens because a compressor doesn’t change the volume instantly or evenly. It reacts over time, and that response can push or pull on different parts of the sound wave. The faster the compressor reacts (like with a quick attack setting), the more it bends the wave, and the more harmonics it creates, especially in the lower frequencies.
Even super slow audio compression adds this kind of change. So anytime you’re compressing, you’re also shaping the tone in small ways. You know that warm, punchy, or “glued” sound you get? That’s not just volume control. It is harmonic content being reshaped.
Compression techniques for harmonic-rich sound design
Let’s explore how you can use compression to your advantage with five creative compression techniques.
1. Add warmth and punch to drums with Supercharger GT
In many genres, drums are what hold the groove together. Compression is a way to enhance your drum sound into something energetic and special. Using Supercharger GT is a great way to add harmonic weight and analog-style grit.
Start by loading Supercharger GT onto your drum track. We’ll start by using the “Ghetto Drums” preset and altering it slightly.
Start with the “Ghetto Drums” preset and adjust the parameters like this to recreate the sound we get.
We’re pushing the compressor quite hard here to get a highly saturated quality that sounds different from a standard saturator.
Here’s what the drums sound like dry:
Native Instruments · dry drums
And here they are with Supercharger GT:
Native Instruments · compressed drums
Of course, this is quite a dirty sound. You can dial back the wet sound on the mix knob to use this effect in a more nuanced way.
2. Use bx_glue on the master bus for analog-style cohesion
Compression isn’t just for individual tracks. It’s actually a great way to bring your mix together through buses or even on the master bus itself. When a compressor acts on multiple tracks and prevents any sound from exceeding a certain level, it can feel like it is “gluing” the sound together.
The bx_glue compressor is designed to mimic the behavior of classic bus compressors found in analog consoles while featuring modern controls. It adds cohesion and tone, without sacrificing the clarity you’ve worked hard to get into your mix.
We’re going to add the compressor to a stereo bus with all our tracks on and dial in the settings below. It’s generally good practice to use a lower compression ratio on bus tracks, but that’s just a rule of thumb. Always use your ears and go with what sounds best.
Make use of the “auto” output level functionality. This ensures that you hear the sound of the compressor itself rather than a jump in level.
Let’s hear what adding bx_glue to the master bus can do.
Here is a track without any master compression:
Make use of the “auto” output level functionality. This ensures that you hear the sound of the compressor itself rather than a jump in level.
Let’s hear what adding bx_glue to the master bus can do.
Here is a track without any master compression:
Native Instruments · no compression
Now let’s add bx_glue:
Native Instruments · bx-glue
This may sound quite subtle, but the compressor has reduced the peaks and increased the low-level signals of different tracks to add cohesion to the mix.
3. Enhance vocal character and color with Supercharger GT
Vocals are one of the most receptive audio sources to compression’s harmonic potential and dynamic control. With the right compression on a vocal track, you can add tube warmth and presence that helps the performance feel intimate and polished. Moreover, it just helps vocals sit better in a mix.
To see this in action, let’s add Supercharger GT onto a vocal track. We’ll start with the “Vocal” preset, but once again, tweak what’s there to get exactly what we’re looking for.
Supercharger GT adds the harmonic saturation necessary to make vocals audible.
Unlike transparent digital compressors, Supercharger GT enriches the vocal with saturation that enhances midrange clarity without making the performance feel harsh.
Here is our loop without compression on the vocal:
Native Instruments · vox dry
Now let’s add warmth and color with Supercharger GT:
Native Instruments · vox supercharger
With the compressor on, the vocal stands out from the rest of the instruments while also sitting better in the mix.
4. Bring elements into focus with Guitar Rig 7’s compression
Guitar Rig 7 LE’s Tube Compressor is another fantastic way to get high-quality analog compression into your tracks.
Guitar Rig 7 LE features dynamic effects that can be applied to any instrument.
Of course, you could use Guitar Rig 7 on a guitar track. But what happens when we apply it to something a bit less conventional, like an instance of Massive X?
Here’s a bass patch created on Massive X:
Native Instruments · massive dry
Now let’s load up the Tube Compressor through Guitar Rig 7 LE:
Native Instruments · massive tube
The harmonics from the bass patch are brought to the front of the sound, to a point where the sound itself feels quite different. This can be a very effective way of creating harmonic presence in your tracks, and allowing subtle elements of your sound to cut through without turning up the volume.
Be careful, though. Intense compression like this can also increase the level of unwanted sounds.
5. Use parallel compression to thicken your mix
Parallel compression is a classic studio trick that allows you to blend a heavily compressed signal with a dry track. This is a great way to retain natural dynamics while adding serious weight and saturation from compression. You can use whichever compressor you’ve enjoyed most so far, but choose something that isn’t too transparent.
First, add your compressor to a return track and make sure the track is set to pre-fader mode.
Using the return track in this way will ensure that the signal received from the original track is not affected by the output level of the dry track’s fader.
Next, send 100% of the signal from the drum track into the return track or bus. Be careful, this could get loud! You’ll want to balance the two signals with their faders so that the dry signal and the compressed signal sit together nicely.
Sending the signal to return track B, which has the compressor on it.
Here is our totally dry drum signal:
Native Instruments · drums dry
And here is our parallel compressed signal.
Native Instruments · drums parallel
Finally, here is what they sound like blended together.
Native Instruments · drums blend
The result is a thicker, more harmonically dense sound that retains the natural feel of the original while adding saturation and impact.
Explore these compression techniques
Compression is a fantastic mixing tool, but it is also a launchpad for a harmonic-rich sound. With plugins like Supercharger GT, Guitar Rig 7, and bx_glue, you can do so much more than dynamic control.
Try these techniques using a 360 Essentials subscription and listen closely. You might be surprised at how much harmonic character can result from creative compression techniques.
Start free trial today
The post 5 ways compression can give you a rich, harmonically-driven sound first appeared on Native Instruments Blog.